 Show and tell for my knitting readers...
Knitters know cables are a one-sided affair. One side looks marvelously complicated and the other side looks like a lumpy mess. Most cabled knitting is knitted on one side and purled on the other – with a few stitches separating the cables. Because of this patterning, projects with cables are not reversible.
A Design Challenge As someone who designed knitting patterns for a short time, I rarely take the easy knitting route. But, I do like designs that have a repetitive pattern that you can quickly get the hang of and rotely knit. I had seen a cashmere reverse cabled scarf at Barneys. I know what you're thinking … She shops at Barneys? Well, Barneys is lovely, and I have had a few shopping moments at Barneys, but I drooled over the scarf at a Barneys outlet store. I wish I had taken a picture of it.
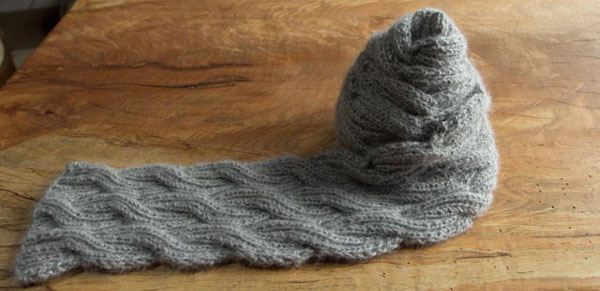
I had it in my head that I would create a similar scarf with reverse cables. There were a few requirements for the design: no background stitches between the cables, no edge stitches, and the cables should produce an irregular wave-like panel.
After a few failed attempts, I tried cabling a K2, P2 rib. The 2 X 2 rib naturally pulls in and creates the magical wavy edge. Even more remarkable, it looks the same on both sides! I promise, this pattern is not as hard as it looks.
The Magical Reverse Cable Scarf
Materials: Yarn: Natural Gray Blue Sky Baby Alpaca Sport Weight ~ 4 skeins Needles: U.S. Size 8 needles, cable needle
Directions: CO 50 st. Row 1 Sl first st as if to Purl with yarn in front, P2, K2 across, end k1. Row 2 Sl first st as if to Knit with yarn in back, P2, K2 across, end k1. Rows 3, 5 and 7 same as Row 1 Rows 4 and 6 same as Row 2 Row 8: Sl 1st st as if to purl with yarn in front, work next 16 sts in pattern. *Put next 8 sts on holder, hold to back, work next 8 sts in pattern, work 8 sts in pattern from the cable needle*, work next 16 sts in pattern, K1 Rows 9-15: repeat rows 1-7 Row 16: Slip the first st as if to Purl. Work cable from * to *. Work next 16 sts in pattern, repeat cable * to *, K1 Work for desired length. End with row 15. Bind off in pattern.
Happy Knitting!


